MicroStrategy ONE
Integrating MicroStrategy Mobile for iOS with AirWatch
You can use the AirWatch platform to add an extra layer of security to iPhones and iPads that are running MicroStrategy Mobile. Instructions for integrating MicroStrategy Mobile with AirWatch are provided below:
You can choose the level of security that you want AirWatch to apply using the Data Loss Prevention setting in the Restrictions of the security profile. For detailed information, refer to your AirWatch Mobile Application Management (MAM) Guide.
- You can enable Data Loss Prevention to protect sensitive data in applications. When you enable this setting, some features are automatically disabled, but you can separately control other actions that involve transmitting data back and forth such as copying and pasting, printing, and taking pictures.
- When you do not enable Data Loss Prevention, you can perform almost every out-of-the-box MicroStrategy Mobile data transfer.
The level of security you choose is determined by the stringency of the security requirements in your environment versus the need for less restrictive data transfer.
- DMG
- Admin
- Cache & Subscription & Pre-cache
- Image cache
- Background Data transfer
- Deferred Execution
- Folder Browsing
- Grid/Graph
- Drill
- Link drill
- UC on dataset
- Transaction
- Offline Transaction
- Smart client-dataset transaction
- DDIC
- Prompts - All kinds of types
- Authentication
- Secure Report/Document
- Security - Restricted Share & Print
- Application Reset
- Logout
- Push Notification
- Badge
- Grid/Graph Quick Switch
- Calendar selector
- Grid interaction improvement
- Retain search history in Filter panel, Prompts
- Retain search history in search box selector
- 3rd party visualizations on iPad
- ESRI Map for RSD on iOS
- Time-based Calendar on iPad
- Graph Drilling on iPad
- Map Current Location on iOS
- Map Clustering default control
- Mobile VI Visualizations – trendline/reference line/formatting/axis origin
The following are required to deploy the MicroStrategy Mobile application with AirWatch support.
- Your organization must be enrolled in the iOS Developer Enterprise Program. For information about this program, visit the iOS Developer web site.
- See What's New in the Mobile SDK for iOS for the Xcode and Apple iOS SDK versions you need to use to develop and compile your application. Previous versions can be downloaded from the Apple Download site.
- You must create
a wildcard App ID for your application, using the iOS Provisioning
Portal. A wildcard App ID is of the form [BundleSeedID].*,
where:
- BundleSeedID is an alphanumeric code that is generated by Apple when you create the App ID.
- The asterisk (*) is a placeholder for the Bundle Identifier of the App ID. The Bundle Identifier is used by iOS to identify the application on your device. You set the value of the Bundle Identifier property in the property list file of your Xcode project. You replace the value of the asterisk (*) with an appropriate string using reverse-DNS format, com.yourCompanyName.YourAppName. For example, we use the default value—com.microstrategy.iPad for an iPad app or com.microstrategy.MSTRMobile for an iPhone app—to integrate with AirWatch.
AirWatch allows customers to upload their mobile applications via their AirWatch Console. There is no need to set up a local app or web server.
Set Up the AirWatch Environment
To set up your AirWatch environment so users can install the MicroStrategy Mobile application with AirWatch support on their mobile devices, perform the administrative tasks listed below. For a detailed explanation of how to perform these tasks, refer to the AirWatch Mobile Application Management Guide.
- Register yourself on AirWatch.
- Set security policies and settings within the AirWatch Console, depending on your requirements.
On your AirWatch console, under Restrictions, select Enable Data Loss Prevention.
On your AirWatch console, navigate to Groups & Settings -> All Settings -> Apps -> Settings and Profiles -> Profiles. Open the SDK profile used by your app and select Enable Data Loss Prevention.
- This automatically disables the following features:
- Open PDF in third-party applications
- Open email URL in third-party applications
- Open telephone, SMS or unknown URL in another application
- Open EPub files in third-party applications
- This enables all the other restriction controls listed below it.
- This automatically disables the following features:
- Choose which of the following restrictions you want to apply for MicroStrategy Mobile by deselecting or selecting the following restrictions:
- Enable Printing
- Enable Copy And Paste
- Enable Composing Email
- Enable Location Services
- Enable Camera
- Add the users and devices in your organization that are allowed to use the mobile application.
- Configure the AirWatch Mobile Access Gateway (MAG) Server.
- Set up the MAG Server as the proxy to access internal resources in your organization.
Configure the list of servers and domains on your network that users can access from outside your corporate firewall, using MicroStrategy Mobile. For example, if users require access to one of your MicroStrategy Mobile Servers while traveling, you must add the MicroStrategy Mobile Server to the list.
For information on configuring the MAG Server, refer to the Mobile Access Gateway Admin and Install guides.
- Install the AirWatch Agent on devices.
- Build the application and upload the file into the AirWatch Console. During this process, you need to assign the profile you created, making the settings defined in the profile available to your application.
-
Deploy your application to managed devices through the AirWatch Console. Users now have access to the application.
Once the application is uploaded to the AirWatch Console and assigned with registered devices, the AirWatch Agent on each device automatically deploys the application on the device.
-
Configure the list of servers and domains on your network that users can access from outside your corporate firewall, using MicroStrategy Mobile.
For example, if users require access to one of your MicroStrategy Mobile Servers while traveling, you must add the MicroStrategy Mobile Server to the list.
Optionally, Enable Integrated Authentication for Single Sign-On
With multiple methods of authentication available, AirWatch removes the burden of repetitive logins by providing a single point of entry across all applications with single sign on capabilities. You can enable Integrated Authentication to allow access to corporate resources such as content repositories, through the AirWatch Container or the AirWatch Agent using AirWatch single sign-on credentials.
You need to make configuration changes in both Air AirWatch and MicroStrategy:
- AirWatch configuration
- Navigate to Groups & Settings -> All Settings -> Apps -> Settings and Policies -> Security Policies.
- Select Enabled and set the following options:
Enable Use Enrollment Credentials to access corporate resources listed in the Allowed Sites field with the SSO credentials.
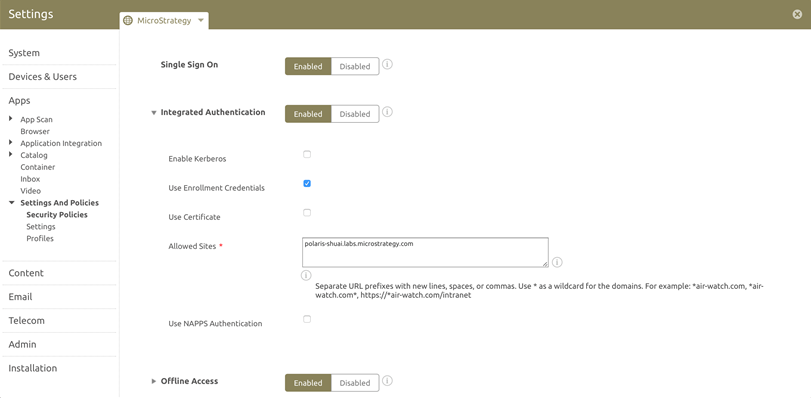
Enable Use Certificate to upload the Credential Source or to set a Defined Certificate Authority, and to access corporate resources listed in the Allowed Sites field with the SSO credentials.
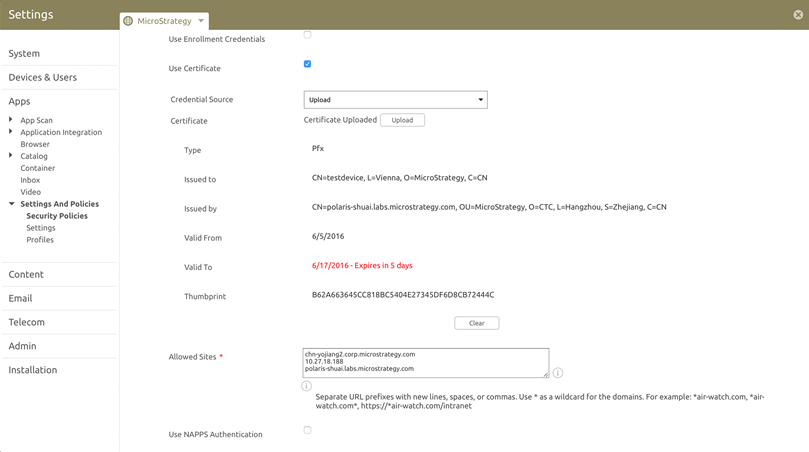
Enter systems in the Allowed Sites field to control access to a specific set of sites and domains. You must complete this setting for Integrated Authentication to work. This setting ensures that AirWatch does not expose to non-trusted resources.
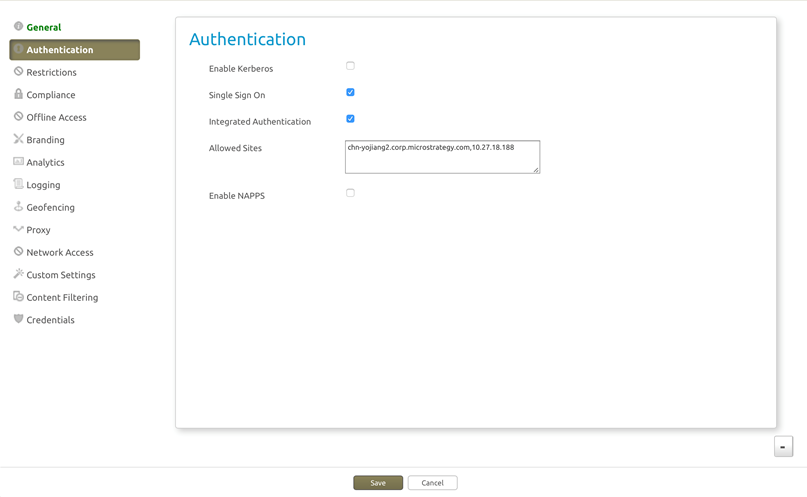
- Create a new SDK profile.
For integrated authentication with enrollment credentials, configure the "Authentication" section. It is populated with the default settings in Security Policies. You can accept these default settings.
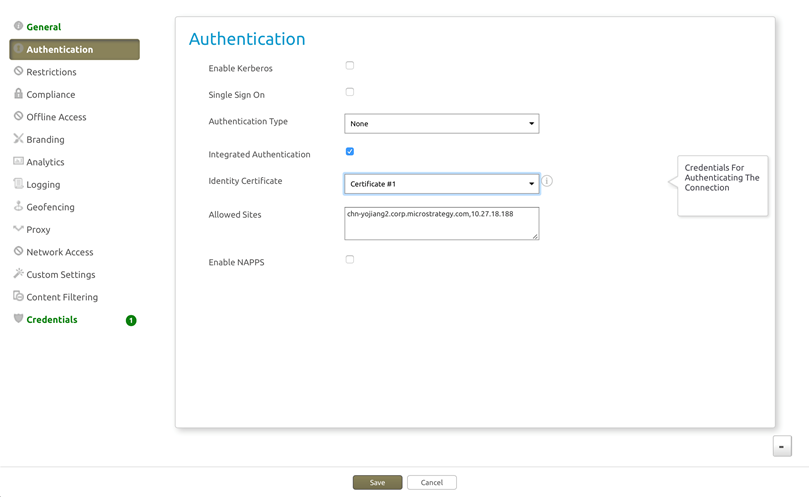
- For integrated authentication with a certificate, do the following:
Configure the "Credentials" section and upload the certificate.
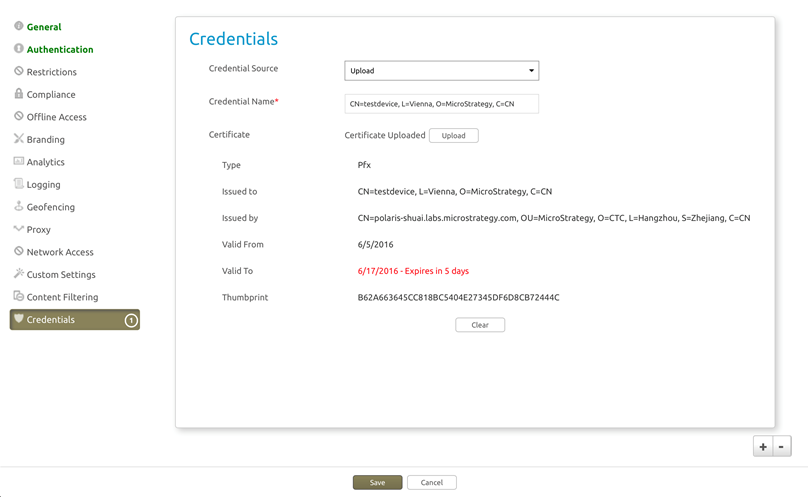
In the "Authentication" section, choose Certificate #1.
- MicroStrategy configuration
-
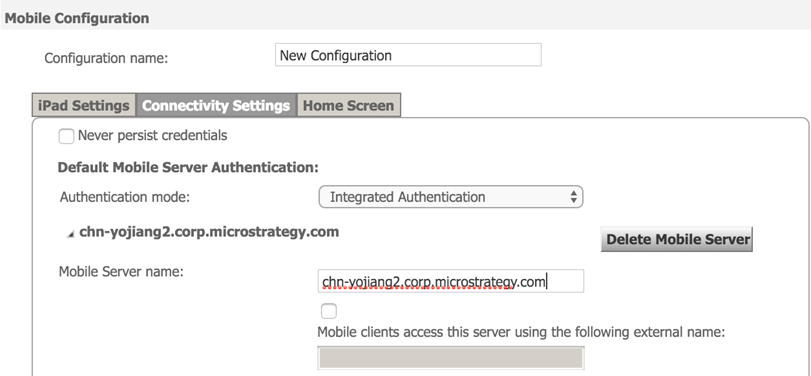
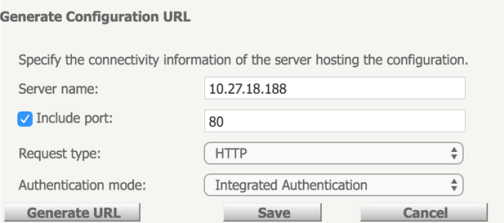
If you configure your app through a mobile configuration URL, you need to set the mobile server authentication mode to "Integrated" on the Mobile Configuration -> New Configuration -> Connectivity Settings tab.
-
If you configure your app through the Settings page in the mobile app, you need to set the mobile server authentication mode to "Integrated" on the mobile server settings page.
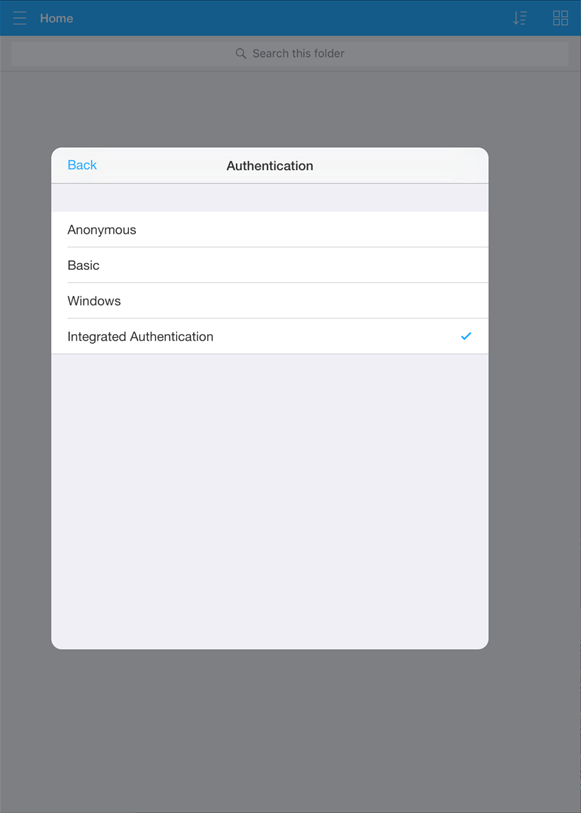
For integrated authentication to work, you must set Integrated Authentication as the authentication mode in MicroStrategy Mobile, and you must correctly configure AirWatch Integrated Authentication on the AirWatch Console. If you set the mobile server authentication to any other authentication mode, integrated authentication will not work. This rule applies to the authentication mode when applying the configuration URL.
-
Deploy MicroStrategy Mobile with AirWatch Support
Use Xcode to configure and build your MicroStrategy Mobile application, and then use the iOS Enterprise Deployment process to install the application on your users’ devices.
Once you have met the prerequisites and set up your AirWatch environment, do the following:
- Download and install the MicroStrategy Mobile SDK integrated with AirWatch
- Configure the MicroStrategy Mobile application
- Create a distributable archive of the application
- Upload and distribute the application
For a list of supported iPhone and iPad devices and operating systems, see the MicroStrategy Readmes.
A detailed description of each step is provided below.
The third-party products discussed below are manufactured by vendors independent of MicroStrategy, and the information provided is subject to change. For detailed instructions to perform the following tasks, refer to the iOS Developer Library.
- Download
and install the MicroStrategy Mobile SDK integrated with AirWatch
On a Mac computer, go to the MicroStrategy Download site and download the latest DMG file for the MicroStrategy Mobile SDK Secured by AirWatch. This includes the MicroStrategy Mobile Xcode project. You must have a username and password to access the download site.
The latest Mobile SDK may or may not be the same version as the version of Intelligence Server you are using.
Double-click the downloaded DMG file.
Click Agree to accept the terms of the license agreement. This opens the disk image.
Copy all the folders to your local drive.
Eject the disk image.
-
Configure the MicroStrategy Mobile application
Make sure that you have created and installed the distribution certificate for MicroStrategy Mobile on your Mac and created and downloaded the distribution provisioning profile. Use the Keychain Access utility on your Mac and the iOS Provisioning Portal to create these files.
- In the MicroStrategyMobile folder copied from the disk image on your Mac, double-click MicroStrategyMobile.xcodeproj. The MicroStrategy Mobile project opens in Xcode.
- Choose either the MicroStrategyMobileIPhone_AirWatch or MicroStrategyMobileIPad_AirWatch scheme, depending on the type of device you are creating the application for.
- Open the appropriate property list file—Info_IPhone_AW.plist for iPhone or Info_IPad_AW.plist for iPad.
- Update the Bundle Identifier property—for example, to com.microstrategy.iPad for an iPad app or com.microstrategy.MSTRMobile for an iPhone app.
- For the scheme you selected, make sure that your distribution provisioning profile is selected under Code Signing in the Build Settings section.
- For the AWURL Scheme, leave the default value.
-
Create a distributable archive of the application
With the project still open in Xcode, do the following:
- From the Build menu, select Build and Archive. An archived version of the application is built, with an .ipa extension.
- Open Xcode’s Organizer window, select the archived application, and click Share Application. The Share Archived Application dialog box opens.
- Click Distribute for Enterprise. The archive is built, and you are prompted to enter information for the application’s manifest file, which devices use to download the application.
- Close Xcode.
-
Upload and distribute the application
-
Upload the file into the AirWatch Console. During this process, you need to assign the profile you created, making the settings defined in the profile available to your application. The Mobile Application Management Guide describes how to upload an application.
-
The final step is to deploy your application to managed devices through the AirWatch Console. Users now have access to the application, along with all the SDK-enabled features you have implemented. For more information on deploying applications to managed devices, see the Mobile Application Management (MAM) Guide.
-
Known Issues
The following known issues are caused by limitations of the AirWatch SDK:
- When an app is uploaded and published on the AirWatch Console, it may take some time before the device receives the notification and has the app installed.
- When a different SDK profile is assigned to the app or the MAG server is enabled as the proxy in the SDK profile, the device may not detect the change and still receive the old profile every time authorization takes place. This issue can be prevented by removing all old versions of this app on the AirWatch Console.