MicroStrategy ONE
External Security Sample Application
Organizations that use MicroStrategy Web often want to authenticate a user against a non-MicroStrategy source, particularly if they already have an authentication system in place. This is very common in corporate portals where the objective is to integrate multiple applications with a single sign-on. You can accomplish this easily in MicroStrategy Web by creating a custom External Security Module, or ESM, that integrates the organization's security mechanism and policies into MicroStrategy Web without having to modify any of the original source code. The custom ESM extends the public ExternalSecurity interface and overrides the appropriate methods to enforce the organization's specific security needs. Refer to Customizing Authentication for a detailed description of how to create and use a custom External Security Module, as well as detailed code explanations for several common ESM scenarios.
The External Security Sample Application is a comprehensive sample implementation that illustrates a number of specific authentication and authorization techniques. It is provided as a guide to show you how easily this can be accomplished and can serve as the basis for creating your own custom ESM. It demonstrates the Web SDK's support for integrating with external security sources and provides a glimpse into what is possible in terms of outsourcing the responsibility for authentication.
This sample application works only in a J2EE environment.
This sample application illustrates two related custom authentication scenarios. In one scenario, a user enters a set of login credentials for a known system on a custom login page and these credentials are automatically mapped to MicroStrategy credentials providing seamless sign-on to MicroStrategy Web. In the other scenario, the default MicroStrategy login page is used, but non-MicroStrategy credentials are entered there and automatically and transparently mapped to MicroStrategy credentials. This sample also includes an additional authorization criteria — using the number of HTTP requests to limit the amount of interaction a user can have in a single session — on top of the criteria that MicroStrategy uses by default. While this is one example of additional authorization criteria that can be added, a custom ESM can enforce a variety of special authorization needs. For example, it can include a timeout or keep-alive function that ends an idle user session more earlier than the default setting.

This topic explains how to install and use the External Security Sample Application. In addition to experiencing a functioning sample application, you can also use the source code for the JSP and JAVA files provided for you as the basis for creating your own custom application.
Installing the sample application
The External Security Sample Application is provided as a plug-in. It is packaged in a ZIP file, called ExternalSecuritySample.zip, located in the samples/java/webapps/ExternalSecurity folder in the MicroStrategy SDK installation folder. To use this application as a plug-in, your MicroStrategy Intelligence Server version must be 9.0 or higher and MicroStrategy Web 9.0 must be installed on the same machine on which you wish to deploy the External Security Sample Application.
The External Security Sample Application was included in prior versions of MicroStrategy SDK, but it was packaged— and, thus, installed— differently. The installation directions in this topic apply only to the sample application packaged as a plug-in.
To install the External Security Sample Application, simply extract ExternalSecuritySample.zip to the root folder of the MicroStrategy Web installation directory. An ESM folder is added to the plugins folder under the root MicroStrategy directory and the classes used by the ESM are added to the WEB-INF/classes folder.
The following JSP files are placed in the plugins/ESM/jsp folder:
-
CustomError.jsp
-
CustomLogin.jsp
-
DemoAdmin.jsp
-
iframe.jsp
-
mstrWeb.jsp
-
PortalAdmin.jsp
-
PortalMain.jsp
The following JAVA files are placed in the plugins/ESM/src folder (in the folder structure com/microstrategy/sdk/externalsecurity):
-
AbstractForm.java
-
CustomLoginForm.java
-
DemoManager.java
-
Logger.java
-
PortalAdminForm.java
-
PortalUser.java
-
PortalUsers.java
-
SampleExternalSecurity.java
The following compiled CLASS files are placed in the WEB-INF/classes folder (in the package structure com.microstrategy.sdk.externalsecurity):
-
AbstractForm.class
-
CustomLoginForm.class
-
DemoManager.class
-
Logger.class
-
PortalAdminForm.class
-
PortalUser.class
-
PortalUsers.class
-
SampleExternalSecurity.class
Together, these files provide both the logic for custom authentication and authorization and the pages displayed in this sample application, including:
-
Portal login page
-
Main portal page
-
Portal administration page
-
User administration page
Using the sample application
Once you have installed the plug-in in MicroStrategy Web, you are ready to use the External Security Sample Application.
The instructions below assume that users are allowed to see the Welcome page before being required to login; if the login first option is specified, the sequence of instructions is be slightly different.
-
Stop and start the web server to clear any previous configuration information.
-
Open MicroStrategy Web and choose a project, such as the MicroStrategy Tutorial project, on the Welcome page.
-
The default MicroStrategy Web login page is displayed. Enter a valid set of MicroStrategy credentials and click OK.
-
The Desktop page is displayed, with a small External Security Monitor box in the bottom right-hand corner of the window.:
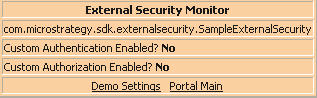 :
:The monitor displays the name of the ESM being used by MicroStrategy Web and whether custom authentication or custom authorization are enabled. Neither are enabled initially, as shown above. If you leave the settings like this, MicroStrategy Web will function as usual. Each time that you need to log back into MicroStrategy Web, the default login page will be displayed and you will be required to enter valid MicroStrategy credentials.
-
You have two options from the External Security Monitor.
-
If you click the Demo Settings link, you can view and change settings that determine the behavior of the custom ESM. This is the option you choose If you want to customize the way that authentication and authorization function. For authentication, you can specify whether to use a custom login page or user mapping. For authorization, you can specify whether to limit access based on the number of HTTP requests. You can also turn logging on and off.
-
If you click the Portal Main link, you can open the main portal page to see the demonstration in action. The behavior of the various links is based on the demo settings. From the main portal page, you can access the Portal Administrator page that allows you to map your portal users to MicroStrategy logins.
If you are going to enable custom authentication using a custom login page, you must first add at least one mapped portal user. Otherwise, you will not be able to log into MicroStrategy Web via the custom login page— which will be your only login option.
-
-
When you click the Portal Main link, the Megacorp Central portal page opens.:
 :
:You have several choices from this portal page.
-
If you click MicroStrategy Projects, you can go directly to the MicroStrategy Projects page. Since you are already logged in to MicroStrategy Web, you are granted access and the Desktop page for that project displays.
-
If you click Logout, you can logout of the portal application. When you log back in to MicroStrategy Web, the login page displayed and the user credentials you use will depend on the changes you make on the Portal Administrator page described below.
-
If you click Portal Administrator, the Portal Administrator page opens and allows you to map your portal users to MicroStrategy logins. You must map at least one portal user to a valid MicroStrategy user before you enable custom authentication using a custom login page (that is, the login page to the portal application).:
 :
:You enter the required information and click the Add User button. The page is updated and the message Created a new entry for user:name is displayed.:
 :
:After you have added one or more new mapped users, click the Portal Main link to return to the Megacorp Central portal page shown at the top of this step
-
-
When you click the Demo Settings link, the Demo Administrator page opens. Initially, all of the demo settings are set to No.:
 :
:If you change the settings to Yes, different options appear. For example, when you enable custom authentication, you can specify whether to use a custom login page or user mapping to log in to MicroStrategy Web. When you enable custom authorization, you can specify the number of allowable open HTTP requests. For logging,there is no other option— you simply turn logging on or off.:
 :
:When you have finished changing the settings, you click the Apply Changes button. If you return to MicroStrategy Web and refresh the page, the new settings appear in the External Security Monitor.:

-
Log out of MicroStrategy Web and open it again. The changes that you have made take effect.
-
If you chose to use a custom login page, after you open MicroStrategy Web and choose a project, the following Megacorp Login page is displayed. On this page, you enter one of the new mapped portal users that you added.:
 :
:If you enter portal user credentials that are mapped to valid MicroStrategy credentials, the Desktop page for the appropriate MicroStrategy Web project (that is, the project you associated with the user mapping on the Portal Administrator page) is displayed when you click the Go for it button.
-
If you chose to use user mapping, the default login page is displayed after you open MicroStrategy Web and choose a project. However, you can now log in to MicroStrategy Web using one of the new portal users that you added— because it is mapped to a valid MicroStrategy user.:
 :
:If you enter portal user credentials that are mapped to valid MicroStrategy credentials, the Desktop page for the appropriate MicroStrategy Web project (that is, the project you associated with the user mapping on the Portal Administrator page) is displayed when you click the Logon button.
-
See also
-
Web authentication: External Security Module
-
Advanced customization topics: Customizing Authentication
-
External security integration: Integrating external security
-
Scenarios: Using the Default Log-in Page, but Validating Against an External User Repository
-
Scenarios: Using the Default Log-in Page and Session Creation, but Mapping User Credentials